
Since I wrote my first post on ‘how to make handmade watercolor paint‘, I’ve learned some things. That first post is still a good starting point for anyone starting out. It just doesn’t go into how to make *better* paints. Either way, whether you stop at the rough version, or go on to refine it, making paint from rock dust starts with rocks. (Or you could also start from clay, soil, charred wood, or bone.) Once the material has been reduced to dust, the rest of the technique is the same. Some things, like charred wood or bones, needs the additional step of charring before it can be reduced to a powder.
If you’d like to see the sort of paintings I make with these pigments, head on over to my portfolio page.

The How-To
Start with Whole Rocks (or dried clay or char chunks)
First, a safety note. Always wear a respirator (n95) when working with rock dust. The silica in sandstone rocks can lead to severe breathing issues. Clay usually has silica dust in it too, so use it for working with clay dust too. Also be aware that some minerals create a very toxic, sometimes poisonous dust! Be sure what you are crushing is non-toxic. Minerals that create toxic dusts include malachite, which makes a green pigment. There are others, so learn the rocks you are crushing. You will need more than an n95 mask for those. You’ll need a respirator rated for the kind of dust you are creating and protection for your skin.
To make paints, first collect some sources for your pigments. It’s important to learn how to choose the best rocks. This helps to make efficient use of your time and labor. Here’s a post on how I determine which rocks are the best ones. If you’d like me to collect a set of good rocks for you from here at Wild Ozark, I have sets of them available in my shop. If you’re local, I do pigment walks (like an herb walk, except we’re looking for pigment rocks) and you can go home with a bag of rocks from our creek and land.
Somehow, you need to convert your rocks, or chunks of rocks to rock dust. (Throughout this post, when I refer to ‘rock dust’, that also includes the dust from other materials like charred wood or bone, or clay.)
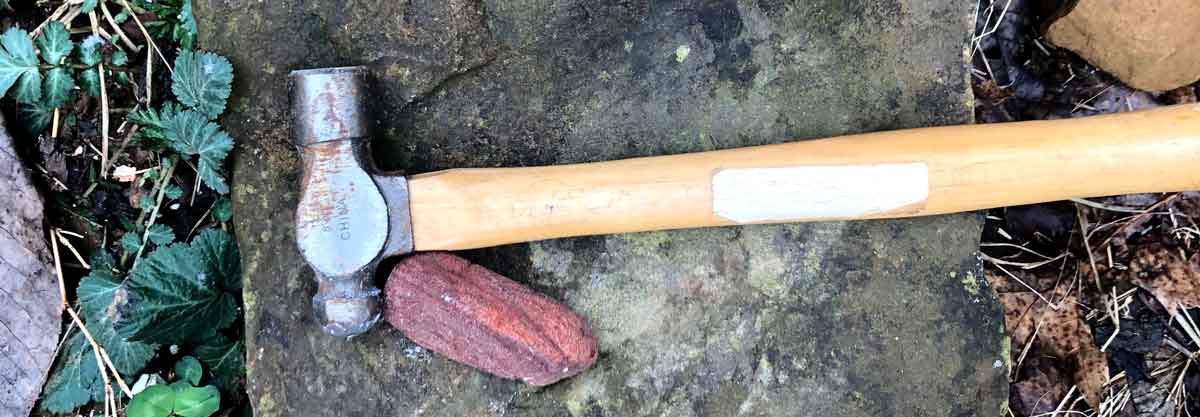
Break Down the Whole Rocks
You’ll have to break the rocks enough to make it feasible to even consider grinding them. Some rocks are harder than others, and so need to be broken into smaller chunks than softer ones require. I do that outside on a larger rock with a ball peen hammer. Sometimes if I’m starting with a particularly large rock, I’ll break it to smaller chunks first by throwing it down onto an even larger rock. Then I’ll collect the pieces and bring it over to my ‘hammer stone’.

I have a cut log to sit on at the rock, which is more comfortable when I’ll be there longer than a few minutes. Sometimes I’m there breaking up rocks for a while, if I’m in the middle of a pigment-making run.
Crush to Powder (Dust)
In this step, you’ll take your broken chunks of rock and grind them to at least a coarse powder. Until recently, I used a mortar and pestle for this. I started out with stainless steel, but found that it transferred a gray color to some of my lighter rocks while I ground them. So I began using a ceramic one. That worked great, except it wasn’t a heavy duty enough model, and I broke it.
Mortar and pestles aren’t designed to ‘hammer’ your rocks. But sometimes that is exactly what I do. So I have found that if I do any pounding, the place of impact needs to be in the center of the bottom. If you hammer the rocks with the pestle on the sides, it will probably break. However, with the stainless steel mortar/pestle, I even used a hammer on the back of my pestle and never broke one. So, there’s a compromise to make either way you go with the type of mortar and pestle you use.
Mechanizing the Crushing
Now I have a motor-driven rock crusher machine and I love it. But that’s an expensive tool and I would recommend seeing if you think you’re going to want to make paints for a while before investing in one. I believe you can also get a finely ground pigment by using a ball mill. I’ve tried using ball media in a rock tumbler, but had trouble with color transfer from that, too.
Even with using the crusher machine, I still have to break the rocks down to 1″ or so. After that, the crusher can take it from there. And, I still use the mortar and pestle to grind down the ‘heavies’ after the washing step.
What I do now is grind it as much as possible, whether with the crusher or the mortar, then wash the resulting rock powders.
Or Start with Rock Dust (or soil, ground dried clay, or char)
When I first started making paint from rock dust, I went through a lot of trouble to sieve until I got as small a particle as I could. Now I don’t bother with sieving at all. It eliminates a lot of effort, but doesn’t save any time. If you want a fast paint, then you will want to sieve and go with your rough pigment.
If you want to make a textured paint, or are in a hurry, you can go directly to making the paint at this point. Paint from rock dust that’s coarse will make a coarse paint. Just grind the pigment you’ve got as much as you can. Sieve it if you want to be sure to separate out the larger bits. Then add your binder. A mulling plate and muller will make a better paint. But if you don’t have those tools, you can just stir the powder in a small jar and use what you get.
If it’s very gritty, a muller and plate won’t help a lot, anyway. How much you process your paint depends upon the desired end result. I’ve gotten to where I enjoy working with paints that are easier to wet and paint fine lines. A coarser paint may be fine for your application if you desire the texture and work in larger swathes. Continue through the next steps to make a smoother paint from rock dust.
Wild Ozark Rock Dust
If you want to make your own paint, but don’t want the rest of the work in gathering rocks and crushing them, you can start out with purchased earth pigments. There are companies out there that specialize in pigments sourced from all over the world. I sell pigments sourced from here at Wild Ozark. I’m not sure if the other companies also offer whole, coarsely ground rocks or if they have only the very fine pigment ready to go directly to paint-making, but I suspect they might. I offer both. You can get whole rock pigment powder and refine it to your liking. Or you can get washed pigment powders that result from washing them.
Here’s a link to one of my whole pigment powders that will allow you to do the rest of these steps but skip the breaking and crushing. It’s just coarsely ground up rock:

Wash the Pigment
For this step I use quart and pint sized jars, and also some half-pints.
Take your coarsely ground pigment dust and add about 4 ounces (volume) to the quart jar. Fill that jar with water and put a lid on it and shake. See all of that colored water? Your ‘lites’ are in there. The ‘heavies’ just sank to the bottom.
This act of washing is also called levigating. With some pigments, like lapis lazuli, the color you’re after will be in the ‘heavies’. In that case you may want to grind the heavies again, and wash again. In some pigments, the more you grind them, the less of your desired color you’ll achieve. Malachite comes to mind. With malachite, the smaller you grind the particles, the grayer the green looks. So it may take some experimenting to see what process works best for your desired results.
And, it very often works out that I get significantly different shades of color from the ‘lites’ and the ‘heavies’. There are some that even give me significantly different shades between the lites that settle out immediately, versus the lites that take more time.
Separate ‘Heavies’ from ‘Lites’
Pour the colored water (but not the sludge in the bottom) into one of your other quart or pint-sized jars. Then fill the original jar back up with water and shake it again to wash your ‘heavies’ a second time.
Repeat this rinsing until the water isn’t so colorful anymore. Always leave the sludge in the first jar, but don’t dump them out when you’re done. Let them dry out. The sludge is your ‘heavies’. When they’re dry, you can grind them again to get a smoother powder. You can use this to make paint, too. Or you can grind and rinse again. The color may be different from what you get with the ‘lites’. Or it may just be a textured version of the same color.

Aaannnd, if you’d like to skip all of the above and go straight to making a smooth paint, you can just order the ‘lites’ in my shop, though sometimes there are some ‘heavies’ that are also pretty fine. Here’s a link to the pigment section of my store.
Smooth Paint from Whole Rock Dust (Pigment) by Washing
To actually make the paint with dried pigment, I use a muller on a glass plate. For the plate I just use a smooth tempered glass cutting board. It doesn’t work right off the bat, though, because the glass needs to be etched in order to ‘grip’ the grit and further break it down when the muller is used. A muller is like a flat bottomed glass pestle designed to be used on a flat surface. Here’s a link to a list of tools I use in making my paint. It’s possible to improvise with most of it while you’re deciding whether or not this is something you’d like to do often.
Jump to the paint mulling section of my earlier post by clicking this line. I don’t want to type it all again, because the info isn’t any different for this section of my new how-to. And you’ll need to know how to make the binder, too. Here’s a link to my article on how I make my watercolor media/binder.
Summary
In summary, you can make a coarse paint from rock dust just by grinding up good pigment rocks and mixing the dust with binder. However, you can make a much smoother paint if you’ll wash the pigments at the ‘coarse’ grind stage. Then you can grind the ‘heavies’ some more and perhaps get smooth paint of a different shade than you’ll get with the ‘lites’. It does take more time, but the results have been worth it to me.
There are some tools I’ve found very useful. I like a heavy mortar and pestle, mulling plate and muller, and my extremely handy rock crusher. But necessity has always been the mother of invention, right? So I’m sure an artist can figure out ways to make paint from rock dust without investing in the tools if they want to. That’s what I did in the beginning. I didn’t start spending money on the other things until I saw that this was something that would be a lifelong obsession.
I hope this tutorial helps you! If you’d like to email or comment with questions, I’m happy to share what I’ve learned. If you visit any of the other wonderful paint-makers listed in the comment section below, let them know where you found them!
There are a lot of paint-makers out there and we’re all learning and sharing as we go. I don’t think a full lifetime will be enough to learn it all. At Instagram, the hashtag #handmadewatercolors will help you to connect with the paintmakers, if you want. I’m @wildozark if you’d like to give me a follow. And if you’re a fellow paint maker who starts from rocks or other whole pigments, please leave tips and a link to your own site!
More Information on Safety
It’s so important to not breathe in the dust from rocks that contain silica. Here’s more information on the dangers:
- https://www.consumernotice.org/environmental/silica-dust/
- https://www.consumernotice.org/environmental/silica-dust/silicosis/
ABOUT
________________________________
Madison Woods is the pen-name for my creative works. I’m a self-taught artist who moved to the Ozarks from south Louisiana in 2005. My paintings of Ozark-inspired scenes feature lightfast pigments from Madison county, Arkansas. My inspiration is nature – the beauty, and the inherent cycle of life and death, destruction, regeneration, and transformation.
Roxann Riedel is my real name. I’m also salesperson for Montgomery Whiteley Realty. If you’re interested in buying or selling in Madison or Carroll county, AR, let me know! You can see the properties that I blog about at WildOzarkLand.com.
Wild Ozark is also the only licensed ginseng nursery in Arkansas. Here’s the link for more information on the nursery
P.S.
There’s always a discount for paintings on the easel 😉
Here’s my Online Portfolio
And, Click here to join my mailing list.
Contact Mad Rox: (479) 409-3429 or madison@madisonwoods and let me know which hat I need to put on 🙂 Madison for art, Roxann for real estate, lol. Or call me Mad Rox and have them both covered!
https://www.youtube.com/@wildozark

