
I use the rocks here to make my paints, but I also use them in other practical ways – and it’s still artful use! I’m building a raised stone path in my garden. Rockwork in a way is like using the earth, stones and structures built between the two as a canvas. I am an amateur at this, but feel equally creative whether building something or making paint.
Today I made a little progress. I’m building a raised stone path on about a 40* slope from the stone steps to the faucet.
This is a project years in the working. My garden is on a hillside behind our house, with one flat cut-out area. The flat area is where Rob used to park his tractor, but now he parks it at the shop. So I decided to use that space along with the hill to build a terraced garden.
Raised Stone Path Plans
The first phase of the project was to put in some stone steps leading to the second main level. One set of steps went on the far end. I don’t use those often. The second set are just a couple of feet inside my gate. They are the ones I tread the most. I’m only about halfway to the top with them. But at least they go to the junction I needed the most – to the turn I take to go to the valve barrel and faucet.


Lateral walking on steep slope
It’s not real easy on the ankles to walk that stretch between the top step to the faucet because of the slope. And this is why I’ve decided to take on the side project to build a raised stone path in that direction before I finish the staircase.
This is taking forever, and is exhausting work. But I am loving the results so far!
The ingredients to build a raised stone path
- chunky rocks (field stone)
- flat rocks
- hand sized chunky and flat rocks
- gravel
- blood, sweat, and tears
The slope where I need to walk is about a 30-40* incline. The distance from start to end is 20′.
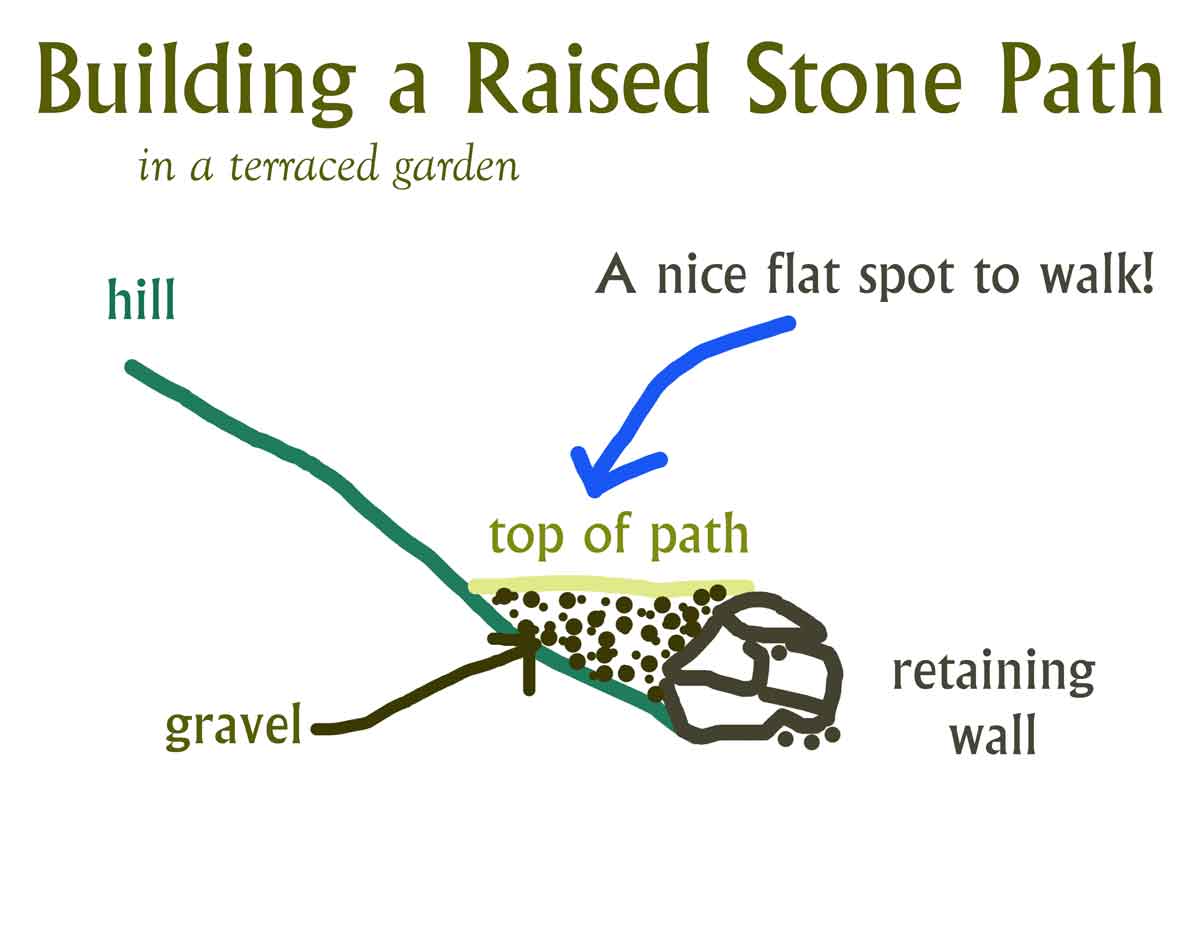
The first thing I did for this path is to gather chunky rocks to make a low retaining wall on the downhill side of where the path will be. This is the reason it’s a ‘raised stone path’, and not a flat on the ground path.
I can’t put it flat on the ground, or it would still be on an angle and not a flat walking surface.
Build the Retaining wall
This is where I use the chunky rocks. These are generally the rocks everyone hates, haha. Farmers have removed them from fields over the years and built beautiful stone walls out here. Some of those walls are still standing.


I use the small chunks and small flat rocks to shim and bring the lower end of the larger chunks into a stable seating. This shimming part is critical for the raised stone path to stay stable.
Of course, rocks come in all shapes and sizes, so sometimes the retainer needs more than one layer (or course) for the retaining wall. Sometimes it becomes a search to find just-the-right-rock.
It needs to be high enough to allow for various depths of large flat rocks along the route. In the case of this wall, it’s about 10″ at the highest point. Depending on the ‘capstone’ that will go on top, the retainer may have to be higher or lower. That’s a wait-and-see and fix-it-as-you-go situation.
The angle of slope isn’t consistent along the stretch, either, so that too is an adjustment on the go. This whole business of using natural stone for building walls or paths is like a gigantic 3-d puzzle. And as much as I dislike puzzles, I LOVE working with stones.
This retaining wall is what makes it a ‘raised’ stone path. The downhill side will eventually be filled in with soil for a garden bed, and it won’t look like a raised path anymore at that time, because I’ll fill it to about the level of the path retaining wall height.
Procure the gravel


There once was a time where I would have had to buy gravel (and rocks, too for that matter!). No more. Now there is always a gravel bed somewhere in the creek. The question is whether it’s going to be easy access with the tractor, or manual with shovels and buckets. I couldn’t make a raised stone path without the gravel. Soil would compact but I guess if I had to, I’d use that.
Unfortunately, at the moment, it’s all manual gravel acquisition. The section I completed today took 3 buckets, and that’s my limit for the day. I can’t fill them all of the way, and can’t lift them into the back of the 4-wheeler, either. So I put them on the side where my right foot usually goes. And now my right foot will go inside the bucket on top of the gravel as I drive back to the garden.
This part of the activity makes me feel like a worker bee. Back and forth from one end to the other of our 1/2 mile driveway. Slowly, with a foot in a bucket on one side, lol.
Get the bucket up the steps
I can’t just carry them up – they’re too heavy. So I ‘lunk’ them. I’m not sure that’s a real word for what I’m doing but I’ll google it and see… oh, that’s right, I can’t. Our Starlink is down, and has been down for more than an hour now. This is VERY unusual and I hope the end of the world hasn’t happened and we just don’t know it yet.
Click to expand my aside on our internet dependency…
Starlink is our only means of knowing what’s going on in the outside world. Maybe it’ll come back on later and I’ll get to publish this article. If not, well, it’ll be the first of my printed newsletters to go out to any feed stores still operating after the crash when I take my monthly trip to town. (I say this partly in jest, partly serious… that’s a not-quite-worst-case scenario for after the fall of this crazy house of cards we’re all living under.)

Anyway, when I say ‘lunk’, what I mean is this. I straddle the bucket and move it forward a little bit. Then take the steps to catch up with it and do it again. I have to do this to get it out of the creek and up onto the driveway first. Then the same process to get it up the steps in my garden and over to the spot where I need to dump it. This way, I get it moved and don’t hurt my back while I’m at it. Just be careful not to over-extend the reach when moving forward.
Start the backfill
Dump the first bucket into the spot waiting for backfill. I will put a few chunk rocks on the vertical (going uphill) at the boundary where I want the gravel to stop, so it doesn’t spread out too much. Usually my goal is one large flat capstone rock. So enough space for whatever sized rock I’m working with that day.

Add the Capstone to your raised stone path
The capstones are flat rocks. They need to cover the retaining wall at least a little, to apply some pressure from above. The amount of gravel backfill depends on thick the capstone is. And if the stone width varies, then I’ll move the gravel around to suit it.
The stone I used today was heavy and larger than my usual. I could not carry it up the steps, so I put it on edge and sort of rolled it from flat edge to flat edge to the top of the steps.
This is a whole body exercise. I use any part of me that can brace or move the rock to get it where I need it.
Once I got to the top of the steps, I had to take a break.


Other rocks can be used to fill in gaps or spaces. I use larger fieldstones between some of the flat stones, always making sure the stone surface is level-ish with the rest of the path.


Top-fill the raised stone path
Once the rocks are in place and stable, pour gravel over the top. Work it down into the cracks and spaces as if it were concrete.

And that’s it! A slow, but extremely satisfying project when you have more rocks than you know what to do with.
I guarantee you’ve used up a lot of your blood, sweat, and tears by now, so I didn’t make a separate paragraph for that.
Raised stone path
I’m really most pleased with how sturdy and steady it feels when I walk on it, and that it is close enough to level. So far, anyway. I’m only about halfway there.

Excuse the feed sacks and cardboard. I use anything on-hand to build my gardens and help with weed suppression and soil building. The earthworms LOVE being beneath the sacks and cardboard. But then, so do snakes. So it’ can be a trade-off.
Contact & About
email: madison@wildozark.com
phone: (479) 409-3429
The newsletter is monthly. My blog is sporadic, so if you want the posts to go to your inbox, put your email address below. Blog posts and newsletters aren’t always the same (very rarely are the same), so it won’t hurt to subscribe to both 🙂


I’m a nature-lover, real estate agent & artist. Sometimes, I also write things. I began using local pigments to paint scenes from nature in the Ozarks in 2018.
All of my artwork is available in prints, and where originals are available, they are for sale. You can find all of that over at shop.WildOzark.com.
If you’re interested in buying or selling in rural northwest AR, get in touch with me by phone, text, or email. I’m happy to help! I have a separate website for my real estate blogging and information at WildOzarkLand.com.
Call me “Roxann” or “Madison”, either one works.


Do you want to:
- learn how to make paints from rocks, soil, or clay?
- Begin Nature Journaling?
- Take plant walks?
- Create nature art or crafts?
Interested in forming a partnership with nature?
Soon you’ll be able to join me at my studio here at Wild Ozark for classes on these things! Sign up for my newsletter to stay abreast of progress: